Advertisement
If you’ve ever tried to collect streaming logs from multiple servers and push them to a centralized data store, you know it’s no easy task. Apache Flume exists to make that process smoother. Lightweight, flexible, and purpose-built for ingesting high volumes of event data, Flume acts as the quiet but efficient middleman between your data sources and destinations like HDFS or HBase.
But like any tool, Flume only performs as well as it's been set up. That means the installation, initial configuration, and basic setup can’t be treated like an afterthought. Here's how to get it right from the beginning.
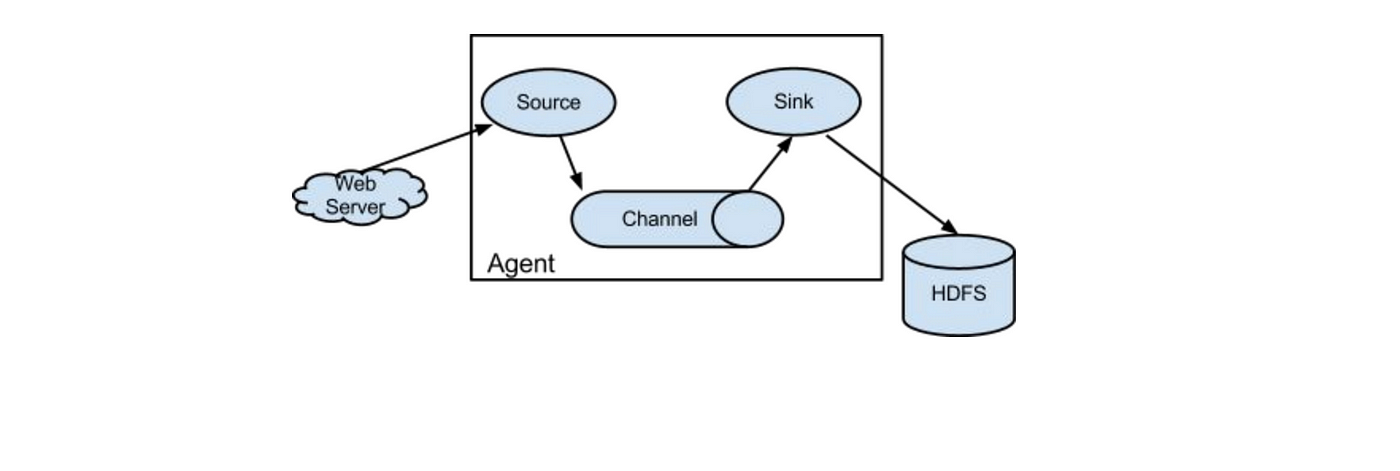
Before installing anything, it's good to know what you're working with. Flume is designed around the idea of agents—tiny data pipelines composed of sources, channels, and sinks. Sources collect the data, channels temporarily hold it, and sinks deliver it to the final destination.
Each agent runs independently, which means you can scale horizontally with ease. You could have a simple agent pushing data from a log file to HDFS or a network of agents feeding data from various locations into a central collector. This modular structure is what makes Flume so versatile, and why getting the configuration right matters so much.
Apache Flume requires Java. Not just any version—Flume generally plays well with Java 8 or 11. To check what you’ve got, run:
nginx
CopyEdit
java -version
If nothing shows up or the version is off, go ahead and install the right version. Most setups can use:
arduino
CopyEdit
sudo apt-get install openjdk-11-jdk
or
nginx
CopyEdit
sudo yum install java-11-openjdk
Go to the official Apache Flume download page and choose the latest stable version. Once downloaded, extract the archive to a suitable location.
bash
CopyEdit
tar -xzf apache-flume-x.y.z-bin.tar.gz
mv apache-flume-x.y.z-bin /usr/local/flume
To make Flume available from anywhere in your terminal, add it to your PATH. You’ll also want to specify the Java home.
In your ~/.bashrc or ~/.bash_profile:
bash
CopyEdit
export FLUME_HOME=/usr/local/flume
export PATH=$PATH:$FLUME_HOME/bin
export JAVA_HOME=/usr/lib/jvm/java-11-openjdk
Then reload the file:
bash
CopyEdit
source ~/.bashrc
Flume doesn’t require a traditional "install" step. Once it’s unpacked and Java is set up, it’s ready. You can verify things with:
pgsql
CopyEdit
flume-ng version
You should see the Flume version and information about the dependencies. If it runs without throwing errors, you're good to move on.
This is where Flume starts to flex. A configuration file in Flume is just a .conf file written in a simple key-value format. It defines how your agents behave—what source they listen to, how they buffer data, and where they send it.
Let’s walk through a basic example.
First, name your agent:
ini
CopyEdit
agent1.sources = src
agent1.channels = ch
agent1.sinks = sink
Let’s say we’re tailing a file:
ini
CopyEdit
agent1.sources.src.type = exec
agent1.sources.src.command = tail -F /var/log/syslog
This source will execute a shell command and stream the output to Flume.
Here, we’ll use a memory channel for simplicity:
ini
CopyEdit
agent1.channels.ch.type = memory
agent1.channels.ch.capacity = 1000
agent1.channels.ch.transactionCapacity = 100
This keeps things fast but isn't ideal for production where durability matters. In those cases, use a file channel.
And finally, let’s write the logs to HDFS:
ini
CopyEdit
agent1.sinks.sink.type = hdfs
agent1.sinks.sink.hdfs.path = hdfs://namenode:8020/user/flume/logs/
agent1.sinks.sink.hdfs.fileType = DataStream
agent1.sinks.sink.hdfs.writeFormat = Text
agent1.sinks.sink.hdfs.batchSize = 100
You need to bind the source and sink to the channel:
ini
CopyEdit
agent1.sources.src.channels = ch
agent1.sinks.sink.channel = ch
Save this configuration to a file—simple-agent.conf.
Once your configuration is ready, you can run the agent directly from the command line:
bash
CopyEdit
flume-ng agent --conf $FLUME_HOME/conf --conf-file simple-agent.conf --name agent1 -Dflume.root.logger=INFO,console
This command tells Flume which agent to start and where to find its config. The -Dflume.root.logger part just makes the logs print to your screen, which is useful during debugging.
If everything is configured correctly, you’ll see log output confirming that the source is running, the channel is initialized, and the sink is writing to HDFS. If something’s off, Flume will usually point you to the line in the config file that’s causing trouble.
Flume offers more than just local file tailing and HDFS sinks. You can chain agents together, use Avro sources for cross-agent communication, or configure failover paths to ensure nothing gets lost.
Here’s a quick overview of what’s possible:
You can define multiple sinks and a sink group with a failover strategy:
ini
CopyEdit
agent1.sinkgroups = g1
agent1.sinkgroups.g1.sinks = sink1 sink2
agent1.sinkgroups.g1.processor.type = failover
agent1.sinkgroups.g1.processor.priority.sink1 = 1
agent1.sinkgroups.g1.processor.priority.sink2 = 2
You can also have multiple sources writing into multiple channels if you want to balance traffic. Just make sure every source-channel and channel-sink mapping is explicitly defined.
If reliability is a priority, switch your channel type from memory to file. It slows things down but guards against data loss during outages.
pgsql
CopyEdit
agent1.channels.ch.type = file
agent1.channels.ch.checkpointDir = /var/lib/flume/checkpoint
agent1.channels.ch.dataDirs = /var/lib/flume/data
Setting up Apache Flume may seem a little verbose at first, but once the pieces click together, it’s a straightforward and effective way to collect and move massive amounts of log data. Whether you're tailing local files, piping events over the network, or writing to distributed stores, Flume handles the heavy lifting so you don’t have to.
Once your agents are properly installed and configured, the rest becomes a matter of scale. And that’s where Flume shines best—quietly doing its job, one event at a time.
Advertisement

How to classify images from the CIFAR-10 dataset using a CNN. This clear guide explains the process, from building and training the model to improving and deploying it effectively

Explore the different Python exit commands including quit(), exit(), sys.exit(), and os._exit(), and learn when to use each method to terminate your program effectively

At CES 2025, Hyundai and Nvidia unveiled their AI Future Mobility Program, aiming to transform transportation with smarter, safer, and more adaptive vehicle technologies powered by advanced AI computing

Can small AI agents understand what they see? Discover how adding vision transforms SmolAgents from scripted tools into adaptable systems that respond to real-world environments

Discover the best AI art generator tools available today. Learn how you can create AI art from text prompts using powerful, easy-to-use platforms suited for beginners and pros alike

How can vision-language models learn to respond more like people want? Discover how TRL uses human preferences, reward models, and PPO to align VLM outputs with what actually feels helpful

Achieve lightning-fast SetFit Inference on Intel Xeon processors with Hugging Face Optimum Intel. Discover how to reduce latency, optimize performance, and streamline deployment without compromising model accuracy

Discover a clear SQL and PL/SQL comparison to understand how these two database languages differ and complement each other. Learn when to use each effectively

Curious how LLMs learn to write and understand code? From setting a goal to cleaning datasets and training with intent, here’s how coding models actually come together

AI saved Google from facing an antitrust breakup, but the trade-offs raise questions. Explore how AI reshaped Google’s future—and its regulatory escape

Learn the top 5 AI change management strategies and practical checklists to guide your enterprise transformation in 2025.

How does Docmatix reshape document understanding for machines? See why this real-world dataset with diverse layouts, OCR, and multilingual data is now essential for building DocVQA systems